Website Admin
Each Spektrix system has a Website Admin Interface, which controls the configuration of the customer interface booking path, allows you to upload additional web resources, such as stylesheets or custom fonts, and allowlists domains.
The Web Admin interface can be accessed via the below link. Access can be granted by your client. This is likely to be the only Spektrix interface you would need to access as the web developer.
https://system.spektrix.com/clientname/client/websiteadmin/websiteadmininterfacepage.aspx
clientname should be replaced with the appropriate client name, which can be obtained from either the venue or Spektrix support.
The interface is split between three tabs:
- Resources - upload stylesheets and other web resources for the Customer Interface.
- Domain Specific Config - configure the Customer Interface for each website domain. Creating a configuration also adds its domain to Trusted Domains.
- Trusted Domains - manage the domains that are allowed to make requests to the client's Spektrix system.
Trusted Domains
Every website origin that calls the Spektrix API, embeds Iframes, mounts managed components or uses web components must use a trusted domain. Spektrix uses this list to determine which origins can make cross-origin requests to the client's system.
There are two ways to add a trusted domain:
- Add it directly on the Trusted Domains tab when the website only needs permission to call Spektrix, such as an API-only or fully custom integration.
- Create a Domain Specific Config when the domain also needs Customer Interface settings. Creating the configuration automatically adds the domain to Trusted Domains.
Adding a trusted domain
- Go to the Trusted Domains tab.
- Enter the domain in the Add New Domain field and select Add.
- The domain will appear in the list of trusted domains below, along with the date it was added.
Enter only the host, without a protocol or path. For example, use mywebsite.com rather than https://mywebsite.com/tickets. Add a specific subdomain such as staging.mywebsite.com when that is the host making requests.
The value must not:
- start or end with a
. - contain spaces or
/
Dotless hosts and explicit ports are supported. For example, you can add localhost or localhost:3000 when developing locally. Ports must be between 1 and 65535.
Removing a trusted domain
Select Delete next to the domain you want to remove. A trusted domain cannot be deleted while it still has an associated Domain Specific Config - you will need to delete that configuration first.
Domain Specific Config
This section controls the Customer Interface settings used for each website domain associated with a client system.
A client may have one configuration for its main website, or multiple configurations if it trades under different names or has microsites with different integration settings.
Listing a domain in Domain Specific Config
Go to the Domain Specific Config tab and select Add. You can then:
- add a configuration for a new trusted domain by entering its domain string
- add a configuration for an existing trusted domain that does not yet have one
Select OK, select the new configuration from the list, then edit its Customer Interface settings. When you enter a new domain, it is also added to the Trusted Domains list automatically.
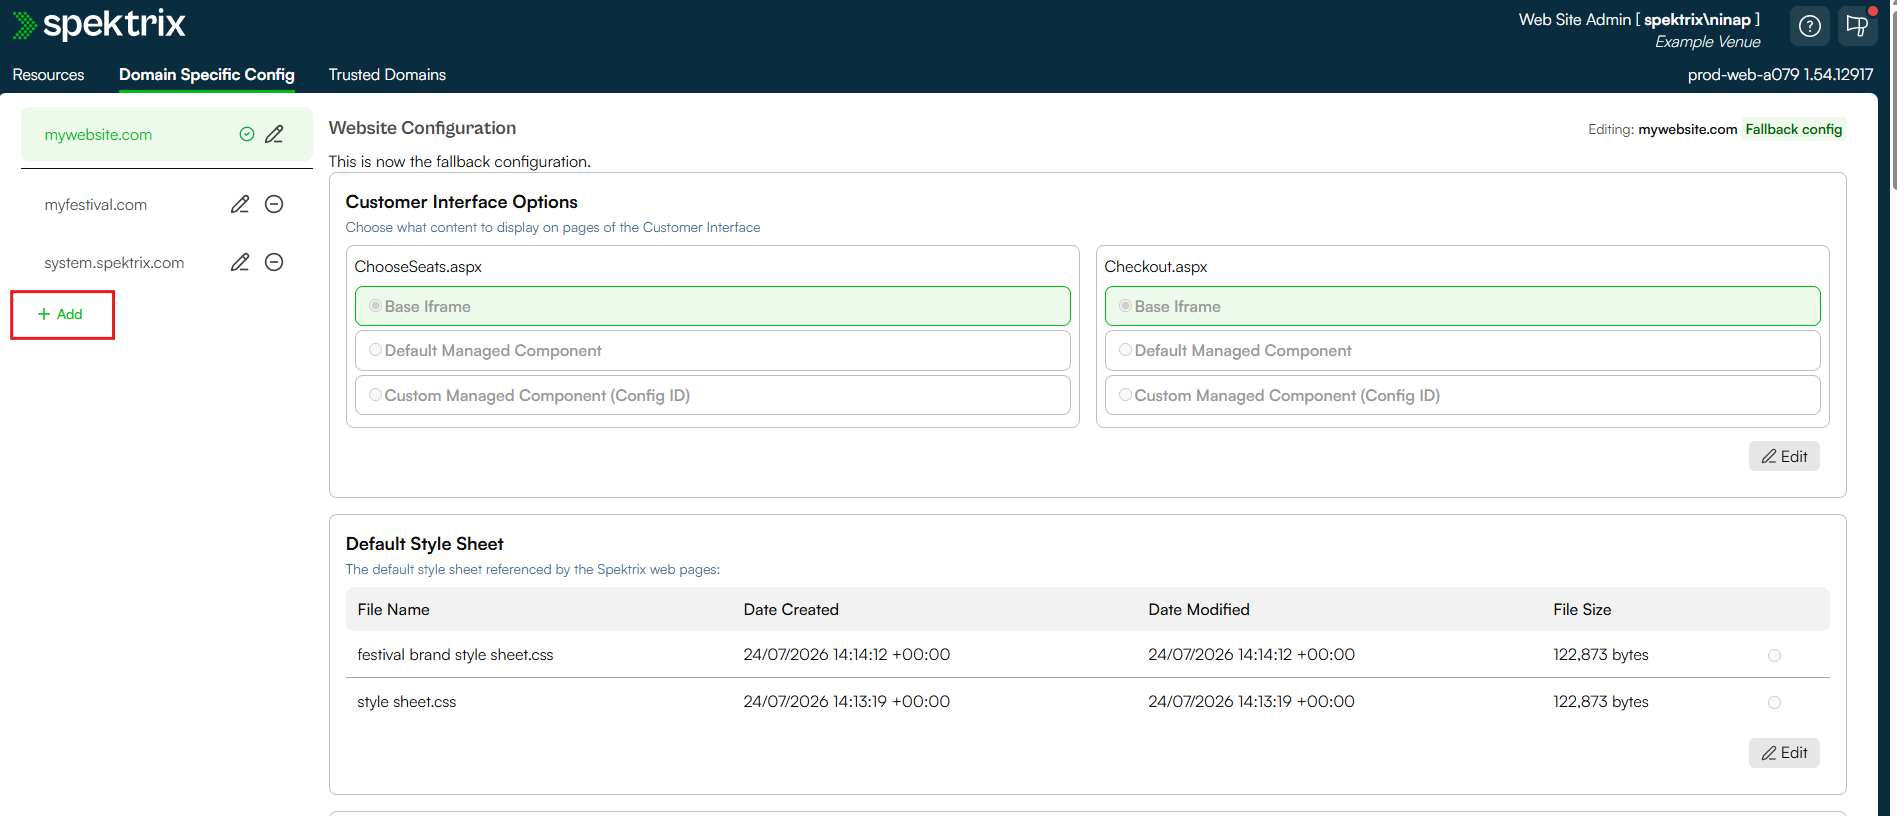
Domain Specific Config matches against the end of the website's host name. For example, mywebsite.com matches both mywebsite.com and www.mywebsite.com, while www.mywebsite.com does not match mywebsite.com. Enter the narrowest value that covers the websites which should share the configuration, without including https:// or a path.
If no domain configuration matches a website, Spektrix uses the fallback configuration.
In order to ensure that the listed domain obeys the correct settings, you must set the Referrer-Policy on the parent website to: strict-origin-when-cross-origin. More information about referrer-policy here: Referrer-Policy - HTTP | MDN. Once that is set, you should see that the Referer of the iframe is the correct subdomain.
Listing subdomains in Domain Specific Config
It is possible to also list domains that consist of a subdomain and root domain. For example, you may want to list a staging website such as staging.mywebsite.com. Or a festival microsite such as festival.mywebsite.com. Either of these domains would use the custom domain tickets.mywebsite.com for embedded iframes, client side API calls and web components.
If you are working with Subsites, the domain you would list is the customer facing subdomain, such as purchase.mywebsite.com.
Choosing the fallback configuration
One Domain Specific Config is marked as the Fallback config. Spektrix uses it when the website's host name does not match another configuration.
Select the configuration that represents the client's main website, then select Make fallback. The previous fallback remains available as a regular domain configuration when it has its own domain.
The fallback configuration cannot be deleted. Make another configuration the fallback before deleting it.
Customer Interface Options
This card lets you choose what content is displayed on two key pages of the Customer Interface for this domain: the seat selection page (ChooseSeats.aspx) and the checkout page (Checkout.aspx). Each page can be configured independently, with one of three modes:
| Mode | Description |
|---|---|
| Base Iframe | The base Iframe |
| Default Managed Component | The default Spektrix-managed component for this page, kept up to date automatically. No configuration ID is required. |
| Custom Managed Component (Config ID) | The managed component using a specific saved configuration. Select a Configuration ID before saving. |
CORS errors
If you are seeing any CORS errors in your integration, this may be due to - but not limited to:
- Not having the Domain you are using listed as a Trusted Domain (either added directly, or via a Domain Specific Config) inside of Website Admin.
- Using a custom domain that is not a subdomain of the parent site.
- Sending incorrect payload information via the API.
- Not explicitly including cookies as part of your call in order to share a session.
Please reach out to the support team if you are struggling to diagnose CORS errors. To help the team diagnose them, send the error as it appears.
Configuring the settings in Domain Specific Config
| Fields: | ||
|---|---|---|
| Sold Out Message | Optional | This field can be edited to tell users what to do if an event becomes sold out. It shows at all times in the customer interface at the point a user selects an instance they would like to see and is independent of the status of the availability. |
| Default Style Sheet | Required | This table shows the full list of available stylesheets uploaded in the resources menu. An option must be selected for the integration to work correctly, even if there is only a single stylesheet uploaded. |
| Checkout Link: | Required | This field should be set to the URL of the page on the website that hosts the IFrame which points at the checkout in the customer interface. |
| MyAccount Link: | Required | This field should be set to the URL the address of the "My Account" page on your website |
| Custom Basket Link | Optional (Requires the use of custom domains) | This field is optional if the website uses basket2.aspx and is mandatory if it uses a custom basket. If a URL is set here, the customer will be redirected to this page when they reach the basket as part of the iframe booking flow. |
| Password Reset Page Link: | Optional (Required when using the Express Checkout) | This field should be set to the URL address of the page on your website where a customer can reset their password. If this is not set it defaults to the Checkout Link above. |
| Redeem Gift Page Link: | Optional | Set this field if you have a specific page on your website, where the redeem gift Iframe is embedded. If this is not set it defaults to the Checkout Link above. |
| Basket "Book more tickets" Link: | Optional | If this field is filled in, a 'continue browsing' button appears in the basket/cart. This link should point to the url for the Event List of the parent site. |
| Reservation Purchase Link: | Optional | The URL of the page on your website where customers can review and pay for reservations. |
| Account Login Link: | Required | This field should be set to a URL, where a customer can log in. More often than not it will be the same url as the MyAccount Link above. |
| Membership Renewal Link: | Required | This field allows you to specify the URL for the ‘Renew Membership’ link in MyAccount Iframe. This field supports filtering by {MembershipId} which will use the MembershipId for the Membership being renewed. |
| Event Details URL Template | Optional | Set this to be the address template of the event detail pages on your website. Must be either of the form https://websiteAddress/{EventId}/details or https://websiteAddress/{WebEventId}/details |
| Use Express Checkout Flow | Optional | Switches on the Express Checkout. We recommend almost all integrations should use this flow. |
| Cookie Options | Optional | Enter the url of a page on your website providing information about enabling cookies for users who have them disabled. You may wish to use the Spektrix Cookies.aspx iFrame on this page. |
| Specify HTML Headers | Optional | This field allows users to add HTML to the headers of every page on the customer interface. This field is useful for adding Google Tag Manager and Pixel tracking of conversions. |
| Specify HTML Immediately After the Opening <body> Tag | Optional | This field allows users to add HTML after the opening <body> tag of every page on the customer interface. This field is useful for adding Google Tag Manager and Pixel tracking of conversions. |
| Specify HTML Headers Specific to Confirmation Page | Optional | This field allows users to add HTML to the headers of only the confirmation page. This field cannot be used with the Express Checkout. |
| Specify HTML Immediately After the Opening <body> Tag Specific to Confirmation Page | Optional | This field allows users to add HTML immediately after the opening <body> tag of only the confirmation page. This field cannot be used with the Express Checkout. This field and the above three fields are useful for aiding Google Tag Manager and Pixel tracking of conversions. |
Setting up your Dev Site with Spektrix
The easiest way to set up your development site is to connect it directly to the live instance of Spektrix the site will ultimately be using (or the latest ‘run’ system, if you are developing your site for a client who has yet to go live with Spektrix).
We use Domain Specific Config in the system, which allows multiple websites to run off one instance of Spektrix, without the different configurations interfering with one another. This means you can set up your dev site without needing to change any settings that will compromise the venue’s current website.
Why not use a ‘sandbox’ version of the system?
Spektrix is a highly configurable platform and venues are able to create custom attributes and configurations with ease. Using a sandbox means you cannot guarantee that you are developing a site that will be fully compatible with the venue’s live system and can lead to unintended bugs when your site goes live.
By connecting directly to a live system, you will therefore ultimately reduce workload for both your team and the venue. Also by receiving live data you can get a better feel for how the venue use their Spektrix system and catch snags earlier in the process, which will allow you to produce a better quality website in a shorter time frame.
What you will need?
- A login to the venue’s Spektrix system with the Web Integration Administrator
permission - this will give you access to the Web Site Admin interface, where Domain Specific Config is setup. Your contact at the venue will be able to set this up for you.
( Note: your Spektrix contact will not be able to set your account up for you, since the act of creating an account is the venue giving you permission to access their data) - The venue’s Client Name. Your contact at either the venue or Spektrix can supply this or it can be found in any system URL related to the venue and will normally be the venue’s name in lower case e.g. yourtheatre
- A unique, static domain for your development site - this allows the system to establish which website an Iframe is embedded into.