Track Pageviews and Purchases in Meta Pixel
We offer pre-configured Google Tag Manager templates that can help you quickly set up Meta Pixel tracking, whether for your entire venue or for specific promoter events. Check out our Analytics Quickstart guide to choose the right template for you.
The following steps take place in Google Tag Manager and will result in installing a Meta Pixel on Spektrix iframes. Unless otherwise stated, naming conventions of Tags, Triggers, and Variables are up to you; however, for the sake of troubleshooting, we recommend to initially use our suggestions.
Add the Pixel Template
The implementation of Meta Pixel requires the addition of a Google Tag Manager template to your Google Tag Manager workspace.
- Go to Templates on the left-hand side of your workspace

-
Click Search Gallery
-
Find Facebook Pixel by facebookarchive

- Click Add to workspace
Create Configuration Variables
Before creating your tags, we recommend creating variables to store your ID and currency settings. If you have already set these variables up previously, please skip them.
- Go to Variables > User-Defined Variables > New.
- Create a Constant variable named
Your Meta Pixel ID. - Enter your Meta Pixel ID as the value.
- Click Save.
- Create another Constant variable named
Spektrix System Currency. - Enter your 3-letter currency code (e.g.,
GBP,USD) as the value. - Click Save.
Setup Pageview Tracking
- A Google Tag Manager account
- Your GTM container added to the Spektrix iframes (see “Add a GTM Container to Spektrix iframes”)
- The Facebook Pixel Template added to your Google Tag Manager workspace
- Your Meta Pixel ID (from your Meta Business account)
By the end of the set up you should have:
- a Pageview Tag
- a Data Layer Variable called
ecommerce.value - a Data Layer Variable called
ecommerce.transaction_id - a Variable to avoid Duplicate Transactions called
customvariable.transactionIsNew - a Purchase Trigger
- a Purchase Tag
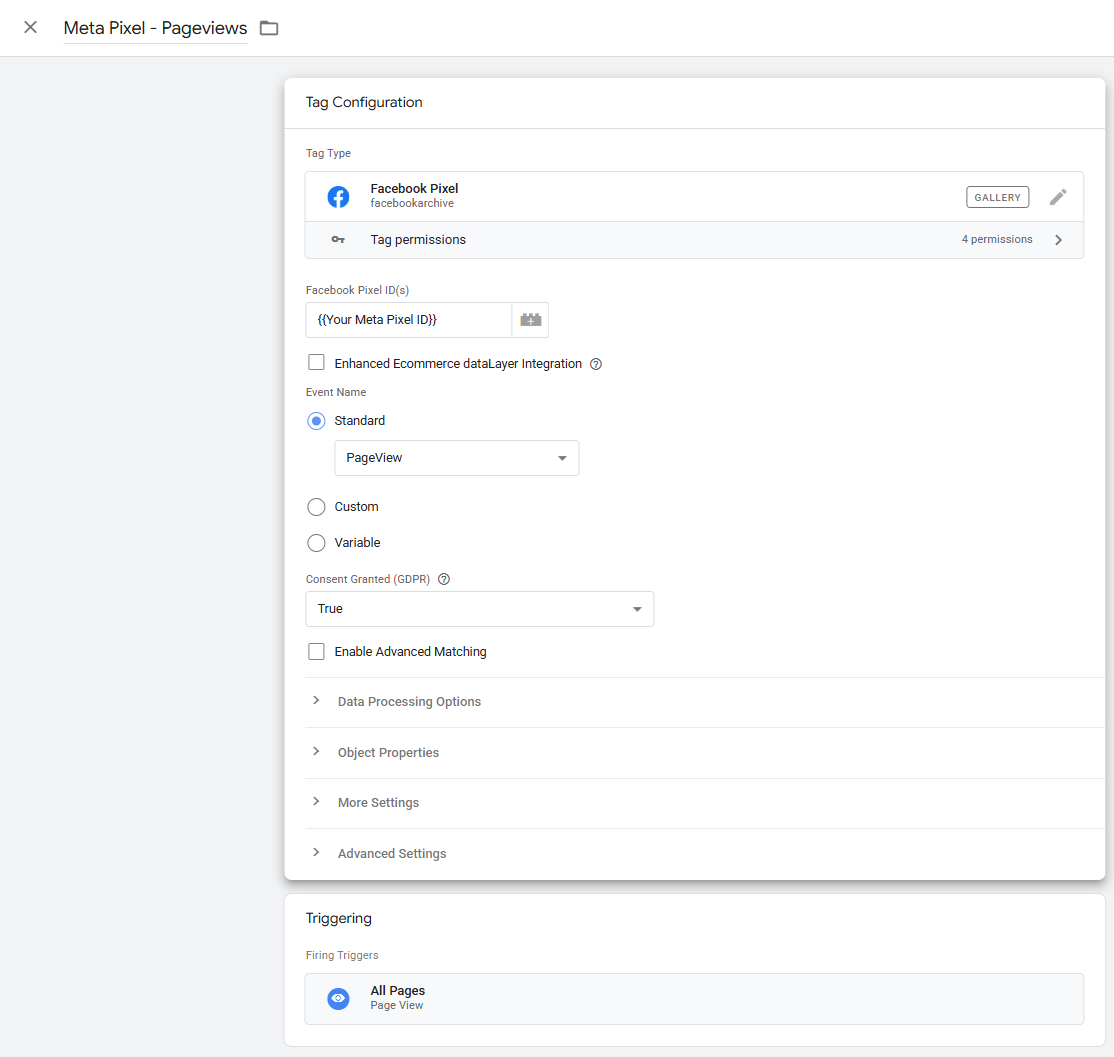
In order to track pageviews in Meta's platform, we will setup a Meta Pixel Tag.
- Create a new Tag called
Meta Pixel - Pageviews. - In Tag Configuration, choose the tag Facebook Pixel which will be found under Custom
- Add the variable
{{Your Meta Pixel ID}}. - For Event Name, select Standard > PageView.
- Under Triggering, select the trigger All Pages
- Click Save
A properly setup Meta Pixel Pageview Tag should look like this:
Setup Purchase Tracking
The Data Layer provided when a Transaction is confirmed is optimized for use with Google Analytics 4 and not for Meta. In order to make the data compatible with Meta's platform, a more complex Google Tag Manager setup utilizing Variables is required.
Step 1: Create the Order Value and Transaction ID Variables
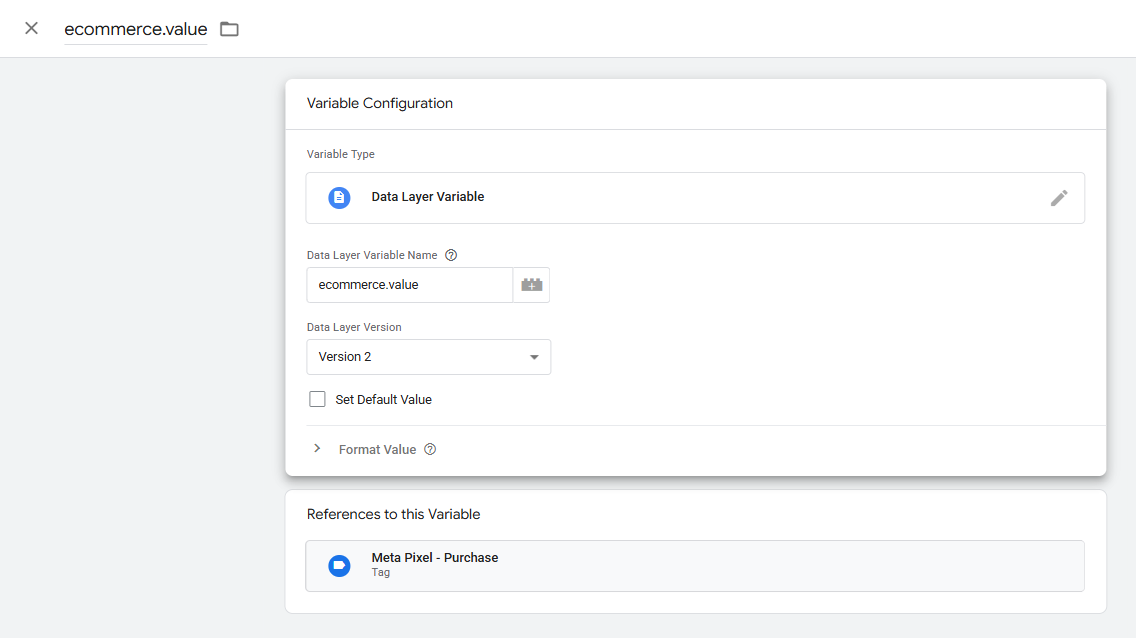
Order Value
This Variable will pass the Order total to Meta.
- On the left-hand side of the Google Tag Manager Workspace, navigate to Variables
- Under User-Defined Variables, create a new Variable named
ecommerce.value - In Variable Configuration select
Data Layer Variableunder Page Variables - Set the Data Layer Variable name to be
ecommerce.value. This needs to be the exact name of the variable, and is case sensitive. - Click Save
A properly setup Meta Pixel Order Value Variable should look like this:
Transaction ID
Repeat the same process for the Order ID variable
- On the left-hand side of the Google Tag Manager Workspace, navigate to Variables
- Under User-Defined Variables, create a new Variable named
ecommerce.transaction_id - In Variable Configuration select
Data Layer Variableunder Page Variables - Set the Data Layer Variable name to be
ecommerce.transaction_id. This needs to be the exact name of the variable, and is case sensitive. - Click Save
Step 2: Create the Variable to Prevent Duplicate Transactions
Google Analytics will de-duplicate Order information by default but Meta will not. Setting up this Variable will prevent passing duplicate transactional information to Meta.
This solution uses the {{Page Hostname}} variable. Ensure this is enabled in your workspace under Variables > Built-in Variables > Configure.
- Under Variables > User-Defined Variables, create a new Variable named
customvariable.transactionIsNew - In Variable Configuration, select
Custom JavaScriptunder Page Variables. - Paste in the following code:
function() {
  var txnId = {{ecommerce.transaction_id}};
  if (!txnId) return false;

  var key = 'spektrix_txn_' + {{Page Hostname}};
  var localStorageTxnId = localStorage.getItem(key)
  if (localStorageTxnId === txnId) {
    return false;
  } else {
    localStorage.setItem(key, txnId);
    return true;
  }
}
- Click Save
Step 3: Create the Purchase Trigger
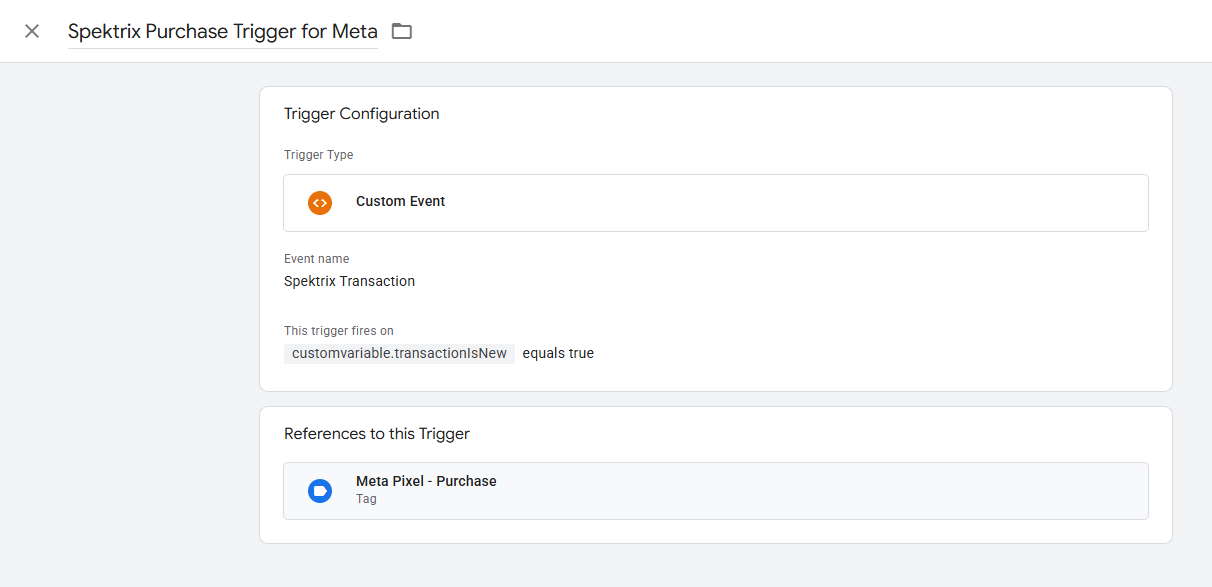
- Create a new Trigger called
Spektrix Purchase Trigger for Meta. - Select Custom Event as the Trigger type.
- Enter
Spektrix Transactionas the event name. This needs to be the exact name of the event, and is case sensitive. - Select Some Custom Events for the trigger to fire on.
- Set the conditions for the trigger
{{customvariable.transactionIsNew}} equals true - Save.
A properly setup Meta Pixel Purchase Trigger should look like this:
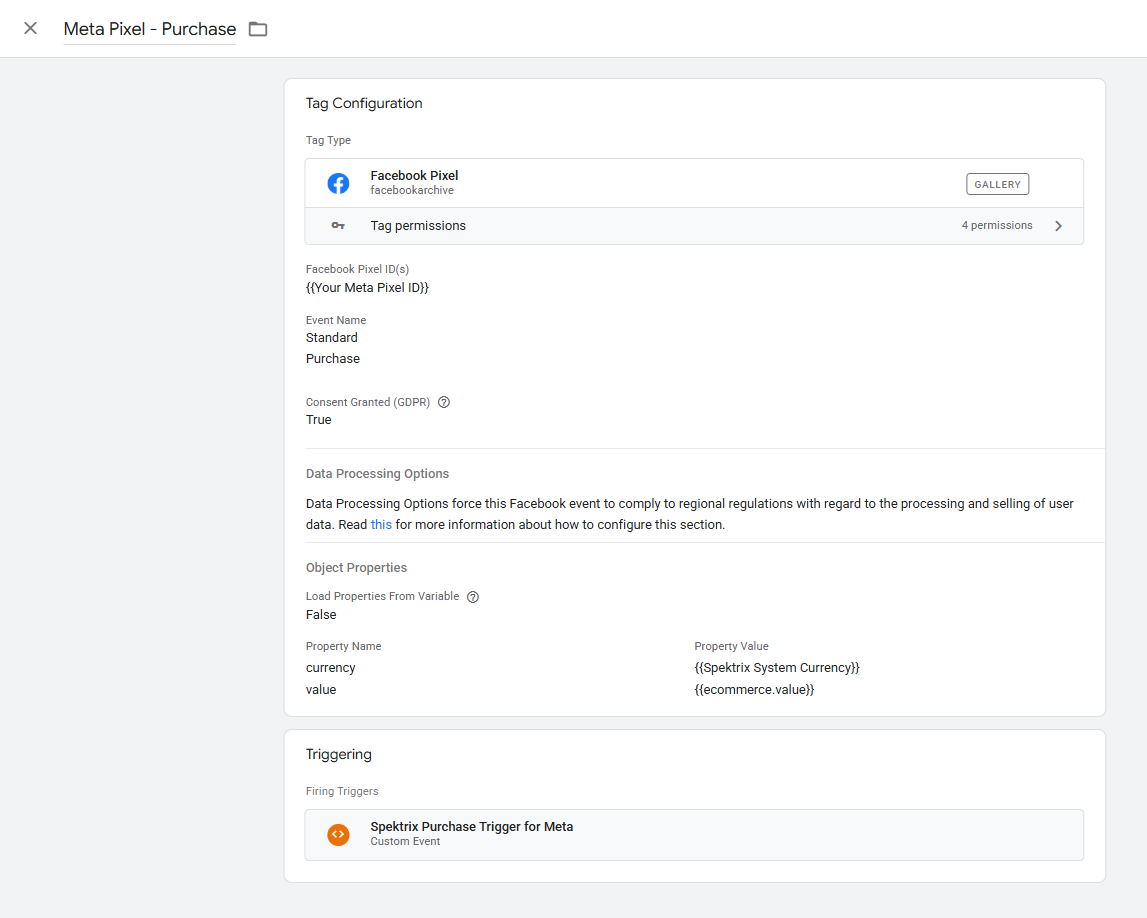
Step 4: Create the Purchase Tag
- Create a new Tag
Meta Pixel - Purchase - In Tag Configuration, choose tag type ‘Facebook Pixel’ under ‘Custom’.
- Add the variable
{{Your Meta Pixel ID}}. - For Event Name, select Standard > Purchase.
- Expand the Object Properties section, click ‘Add Row’ twice and enter:
| Property Name | Value |
|---|---|
currency | {{Spektrix System Currency}} |
value | {{ecommerce.value}} |
- Set the trigger to be the custom event
Spektrix Purchase Trigger for Meta. - Save
A properly setup Meta Pixel Purchase Tag should look like this:
Setup Purchase Tracking for Specific Items
- A Google Tag Manager account
- Your GTM container added to the Spektrix iframes (see “Add a GTM Container to Spektrix iframes”)
- The Facebook Pixel Template added to your Google Tag Manager workspace
- A Meta Pixel ID (from an external Meta Business account)
By the end of the set up you should have:
- a Data Layer Variable
ecommerce.value - a Data Layer Variable
ecommerce.items - a Data Layer Variable
ecommerce.itemIds - an Item Specific Purchase Trigger (for every new item you want to track)
- an Item Specific Purchase Tag (for every new Meta Pixel provided)
On occasion, you might need to track information on Orders that only contain specific items (and their corresponding information). This tends to be needed if an external company you are working with wants to track the specific items relevant to them. For example, an external producer may want to run Meta adverts for their specific Event and to track conversions from their advert.
The steps below explain what you need to set up in Google Tag Manager so that a Meta Pixel only tracks Transactions that contain Tickets to their Event.
If you want to avoid manually creating variables and triggers, we have a pre-configured template for this exact scenario.
- Go to our Analytics Quickstart.
- Follow the instructions in Path 2: Adding a Promoter Pixel to download and import the template.
We will begin by creating three User Defined Variables in your Google Tag Manager workspace. Once the Variables are setup, they can be reused in the future if/when you need to send information to a new external Meta Pixel. If the Variables below already exist from previous work in Google Tag Manager, you can skip to Step 4 to setup the Trigger(s).
Step 1: Create Promoter Variable
Promoter Pixel ID
- Create a Constant Variable named
Meta Pixel ID [External/Promoter]. - Enter the Promoter's Pixel ID as the value.
- Click Save.
Step 2: Create the Items Array Variable
This Variable will access the individual items in the Data Layer.
- Create a new Variable named
ecommerce.items. - In Variable Configuration select
Data Layer Variable. - Set the Data Layer Variable name to be
ecommerce.items. - Save
A properly setup Meta Pixel Items Array Variable should look like this:

Step 3: Create the Concatenated Item IDs variable
This Variable pulls all the Item IDs from a completed Order, which will allow you to identify the specific items you are looking for.
- Create a new Variable named
ecommerce.itemIds. - In Variable Configuration select
Custom JavaScript. - Paste in the following code:
function() {
  var item_idString = {{ecommerce.items}}[0].item_id;
  var numItems = {{ecommerce.items}}.length;
  for(var i=1; i<numItems; i++) {
    var nextItemName = {{ecommerce.items}}[i].item_id;
    item_idString = item_idString + ',' + nextItemName;
  }
  return item_idString;
}
- Save
Step 4: Create a Promoter Item ID
- Create a Constant Variable named
Spektrix Item ID for Meta Pixel [External/Promoter]. - Enter the formatted Item ID you wish to track (see below).
- Click Save.
If you want to track a specific Event, you can find the Event ID in Spektrix by navigating to Admin Interface > Events > [your event] > Basic Details > Event ID:

Alternatively, if you do not have access to the Admin Interface, or would like to track items that are not Event Tickets, use the Spektrix API or the API Lookup tool. When looking the ID up via these methods, they will be much longer than normal: you will only need the numbers from the beginning of the string. For example, if the ID is 50601ARPGPBJPBBJPGRVPTHVCMTBCKDRT you only need 50601.
- Using the numeric ID, determine the Trigger Value using the below formats:
| Item Type | Format to Use in Trigger | Example Item ID | Example Trigger Value |
|---|---|---|---|
| Event Ticket | T[eventID]I | Event ID = 82811 | T82811I |
| Merchandise | M[itemID]- | Merchandise ID = 200 | M200- |
| Donation | D[itemID], | Donation ID = 7808 | D7808, |
Step 5: Create the Item Check Variable
This variable returns true if the specific item ID is found in the current order.
- Create a new Variable named
customvariable.itemIdInOrder. - In Variable Configuration select
Custom JavaScript. - Paste in the following code:
If you are creating multiple different variables in order to track different items simultaneously, you will need to replace the text Spektrix Item ID for Meta Pixel [External/Promoter] with the name of your corresponding Item ID variable created in Step 4.
function() {
  var myConstant = {{Spektrix Item ID for Meta Pixel [External/Promoter]}};
  var itemIds = {{ecommerce.itemIds}};

  // Check if itemIds contains your constant value
  if (itemIds && itemIds.indexOf(myConstant) > -1) {
    return true;
  }
  return false;
}
- Click Save
Step 6: Create the Promoter Revenue Variable
This variable calculates the total revenue only for items matching the Promoter's ID.
- Create a new Variable named
customvariable.onlyItemValue. - In Variable Configuration select
Custom JavaScript. - Paste in the following code:
If you are creating multiple different variables in order to track different items simultaneously, you will need to replace the text Spektrix Item ID for Meta Pixel [External/Promoter] with the name of your corresponding Item ID variable created in Step 4.
function() {
  var spxTxnItems = {{ecommerce.items}}
  var specItemId = {{Spektrix Item ID for Meta Pixel [External/Promoter]}}
  var metaItemSum = 0
  var itemsArrayLength = spxTxnItems.length
  for (var i = 0; i < itemsArrayLength; i++) {
    var iterItem = spxTxnItems[i]
    if (iterItem.item_id.includes(specItemId)) {
      var specificMetaItemSum = iterItem.price * iterItem.quantity
      metaItemSum += specificMetaItemSum
    }
  }
  return metaItemSum
}
- Click Save
Step 7: Create an Item Specific Trigger
Set up triggers so that your Purchase Tags only fire when the Transaction contains Tickets for the specific Event.
- Identify the specific Item ID in the format required for the Trigger
- Create a new Trigger named
Spektrix Purchase Trigger for Meta - Specific Item [External/Promoter]. - In Trigger Configuration select
Custom Event. - Enter
Spektrix Transactionas the event name. - Select Some Custom Events.
- Set criteria to be
customvariable.itemIdInOrderequalstrue.
If you are creating multiple different variables in order to track different items simultaneously, you will need to replace customvariable.itemIdInOrder with the name of your corresponding Item ID variable created in Step 5.
- Set the second condition to be
customvariable.transactionIsNewequalstrue. - Save
This trigger can then be used to fire a tag when and only when a confirmed Order contains Tickets to the specified Event.
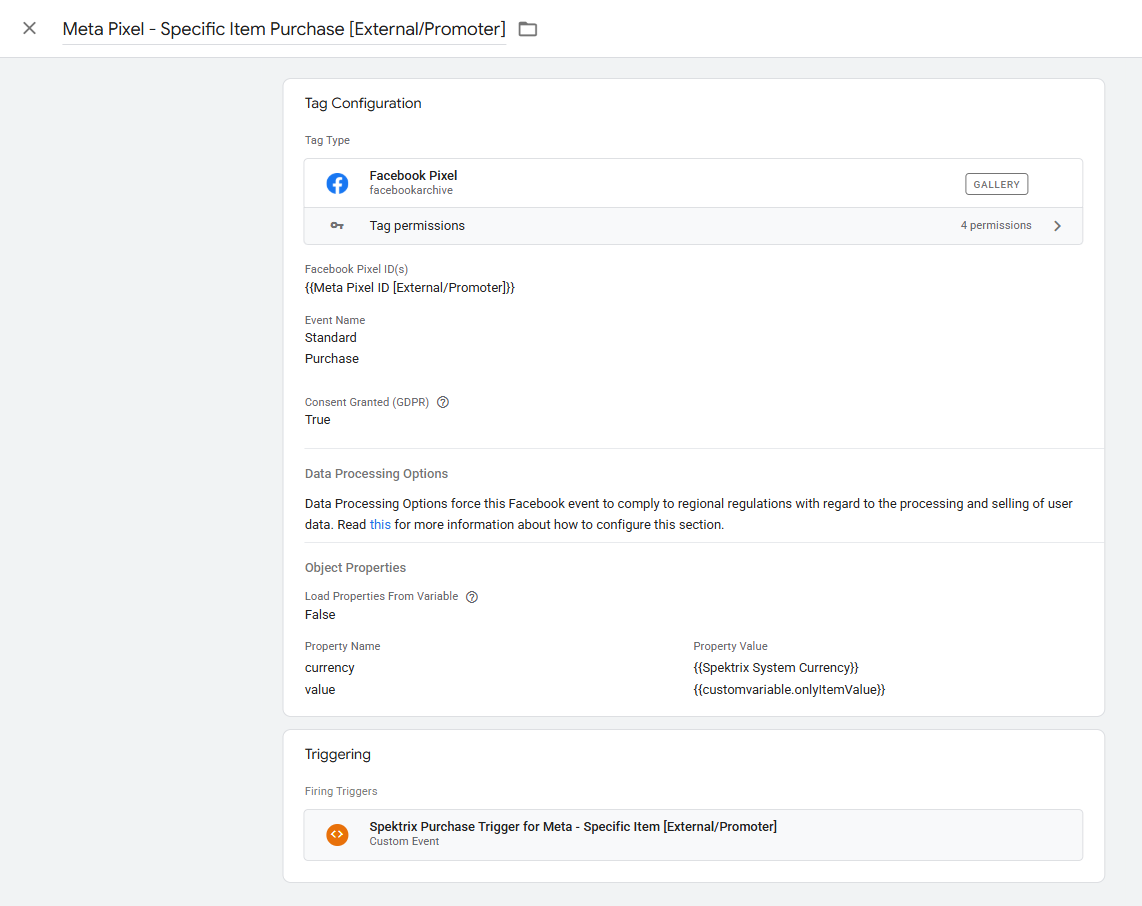
Step 8: Create an Item Specific Purchase Tag
- Create a new Tag
Meta Pixel - Specific Item Purchase [External/Promoter]. - In Tag Configuration, choose tag type
Facebook Pixel. - Add the variable
{{Meta Pixel ID [External/Promoter]}}. - For Event Name, select Standard > Purchase.
- Expand Object Properties, click Add Row twice and enter:
If you are creating multiple different variables in order to track different items simultaneously, you will need to replace {{customvariable.onlyItemValue}} with the name of your corresponding Item ID variable created in Step 6.
| Property Name | Value |
|---|---|
currency | {{Spektrix System Currency}} |
value | {{customvariable.onlyItemValue}} |
- Set the trigger to be
Spektrix Purchase Trigger for Meta - Specific Item [External/Promoter].
If you are creating multiple different variables in order to track different items simultaneously, you will need to replace the trigger Spektrix Purchase Trigger for Meta - Specific Item [External/Promoter] with the name of your corresponding Item ID variable created in Step 7.
- Save
A properly set up Meta Pixel Item Specific Purchase Tag should look like: